Tag Archives: android 4.4 car stereo

image_pdfimage_print
22Jul/15

How to Disconnect the Mazda 3 Car Stereo Wiring Harness

It's only fair to share...Share on FacebookShare on LinkedInPin on PinterestShare on RedditShare on TumblrShare on StumbleUponDigg thisShare on VK

FD1771

A bad car stereo wiring harness can prevent your Mazda 3 car stereo from working. When this happens you either need to pay a mechanic to replace it, or you need to replace it yourself. The first step is to disconnect it. For the novice who knows little about a car’s wiring, this is a simple task that can easily be performed. Here’s how:

Things you’ll need:

  • Screwdriver
  • Flashlight

Step 1 – Remove Your Dash Console

To get a clear view of your car’s panel, how the stereo is installed in your car, and where you’ll find the wiring harness, remove the dash panel. Disconnect the stereo unit by removing any screws that connect the unit to your dash panel. Put the screws aside for use in replacing the stereo and panel. If the screws are stripped or corroded, replace them before continuing.

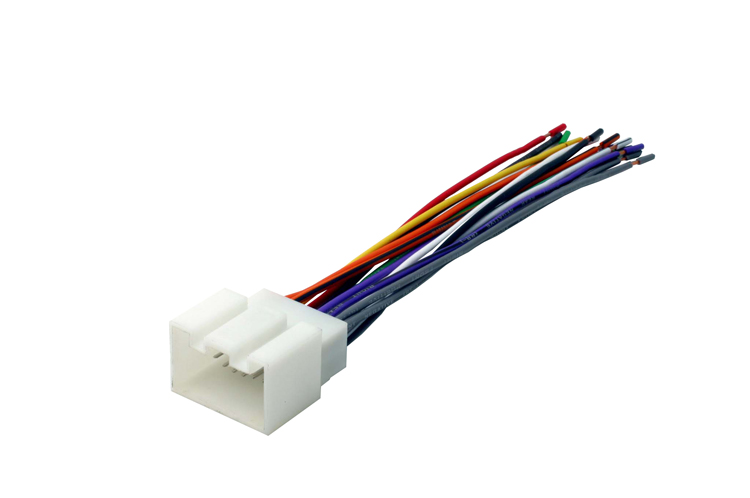
Step 2 – Disconnect the Wiring Harness

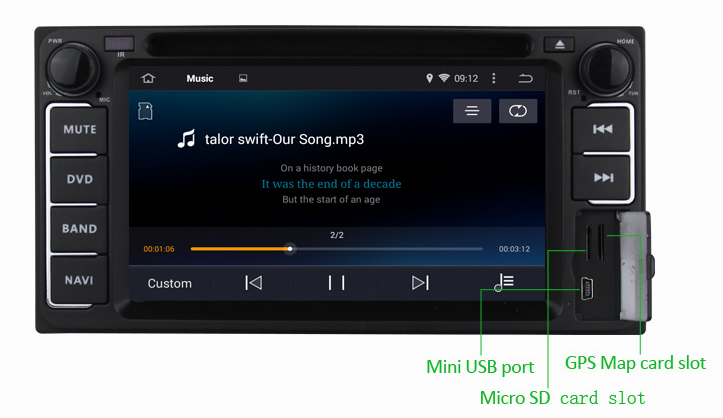
Pull the stereo unit out from your dash panel. On the back side of the unit you’ll see a number of wires connected. This is your wiring harness and will likely be clipped to the Android car stereo. Unplug the wires from the harness. Finally, identify the wires that are coming from your speakers and are connected to the harness and disconnect them by pulling them loose from the harness.

Source: Doityourself.com

www.pdf24.org    Send article as PDF   
21Jul/15

3 Advantages that a Car Radio SD Card Slot Gives You

It's only fair to share...Share on FacebookShare on LinkedInPin on PinterestShare on RedditShare on TumblrShare on StumbleUponDigg thisShare on VK

As technology moves forward, more options are available for stereos, including a car radio SD reader. This is similar to an MP3 player, but much smaller. SD stands for Secure Digital, and these small cards are used to store information for handheld devices. They are commonly found in digital cameras, laptops and more recently, touch screen car stereo. There are several reasons to consider this over other types of stereos.

图片1

1. Size

An SD card is much smaller than other types of music media, including MP3 players or CDs. An SD card can easily fit in a wallet, and is simple to keep tucked away when not in use. If you don’t need to listen to tens of thousands of songs, an SD car stereo may be a great option. In most cases you can get around 1,000 songs on each SD card, depending on the size of its memory.

2. Easy to Replace

Also unlike an MP3 player, an SD card is cheaper and easier to replace. Replacing one of these if they become damaged or lost can be as little as $20. Replacing an MP3 player can be well over $100. You can also find replacement SD cards very easily; most retail locations and drug stores will carry them.

3. Video Formatting

For those who have an audio/video system set up in their vehicle, some cards will allow you to upload videos to the card. This can be a benefit if you’re traveling with young children. You can just pop the card into the Nissan car stereo and the video will be played on the video system.

Source: Autos.com

www.pdf24.org    Send article as PDF   
07Jul/15

How to Bench Test the VW Radio

It's only fair to share...Share on FacebookShare on LinkedInPin on PinterestShare on RedditShare on TumblrShare on StumbleUponDigg thisShare on VK

You should bench-test your VW radio before it is installed, especially if it is a used unit. This will save you from trying to troubleshoot it after it is installed in the cramped quarter of the vehicle’s dash. Bench-testing the VW radio is a straightforward process as speaker wiring is paired into colors that are standard across the industry. You can quickly bench-test the VW head unit with a few test leads, a spare speaker and a power source.

3f15f8f1456f20335051b15e819bc447

Things You’ll Need

  • Roll of 12-gauge electrical wire
  • Eight alligator clips
  • Electrical pliers
  • Audio test speaker
  • Antenna with connector
  • 12-volt car battery

Instructions
1.Cut four, 2-foot jumper wires from the roll of electrical wire. Strip a half-inch of insulation from the ends of each wire with the electrical pliers.
2.Set the Android car stereo down, with the display facing you. Locate the four pairs of speaker wires: two white, left-front; two grey, right-front; two green, left-rear; two violet, right-rear. The solid-colored wires are positive; striped are negative.
3.Attach the end of one jumper wire to the positive wire of the test speaker with an alligator clip. Connect the other end of the jumper to the positive wire of the grey pair. Repeat with second jumper wire for the negative speaker wire.
4.Insert the antenna lead into the antenna socket on the stereo.
5.Attach one end of a third wire to the positive terminal of the battery with an alligator clip. Clip the other end of the wire to the red, yellow and orange wires coming from the stereo. Attach the fourth jumper wire to the stereo’s back grounding wire, and the other end to the battery’s negative terminal.
6.Turn on the stereo. Check the display for power. Adjust the volume control and left-right and front-rear fade controls while listening for the volume to fade in and out accordingly.
7.Turn the stereo off and move the jumper wires to the next pair or wires. Repeat for each pair of colored wires.


Source: Ehow.com

www.pdf24.org    Send article as PDF   
image_pdfimage_print