Category Archives: How to

image_pdfimage_print
02Jun/15

How to Fix These Frequent Issues of Android Car Stereo?

It's only fair to share...Share on FacebookShare on LinkedInPin on PinterestShare on RedditShare on TumblrShare on StumbleUponDigg thisShare on VK

$4EWFI{HLGV1JG]`F5~BX$H

Q1: I set up the date to be the GPS date. The GPS show the right hour, but on car stereo’s main menu the time is 1 hour different. The time zone is correct. Could you help me to have the right time ?

Please don’t use local time, forward or backward to adjust the time zone. You can adjust the time in Setting.

    Q2: When playing music from the SD card, the player is not moving to the next song or is getting stock after few songs. Is issues with app ? Is any update for that?

Please use the small storage SD card, preferably less than 32GB. Did you have some songs for lossless formats or other formats ? Please use the flash disk or MP3 player.

    Q3: Why the GPS of Android car DVD player can’t get signal ?

About the GPS signal, please check the following issues:

  • GPS antenna didn’t connect well with the GPS slot;
  • GPS is put to the wrong place, please put it to a good reception place;
  • Bad weather or the building around would affect the reception of the GPS, please try it another day or another place for good reception.

https://www.dropbox.com/s/9pdbohtmzlxlv9g/affect%20satellites%20reception.jpg?m=  

  • The wire which connect the GPS slot and the mainboard is loose, please open the car stereo and check inside.

    Q4: Why the media unit of car DVD player is dead ?

Have you tried to reset the head unit? If no, please reset the unit by using a needle to press the “RST” for more than 2 seconds. Before doing this, please make sure that both your car and the head unit are turned on.

If you’ve already done above and found nothing help, please remove the car DVD player and wait for half a day, then power on and check again.

However, if it’s still nothing improve, please re-install the system according to the instruction below:

http://www.news.autopumpkin.com/how-to-upgrade-your-android-head-unit-from-4-2-to-4-4-kitkat/

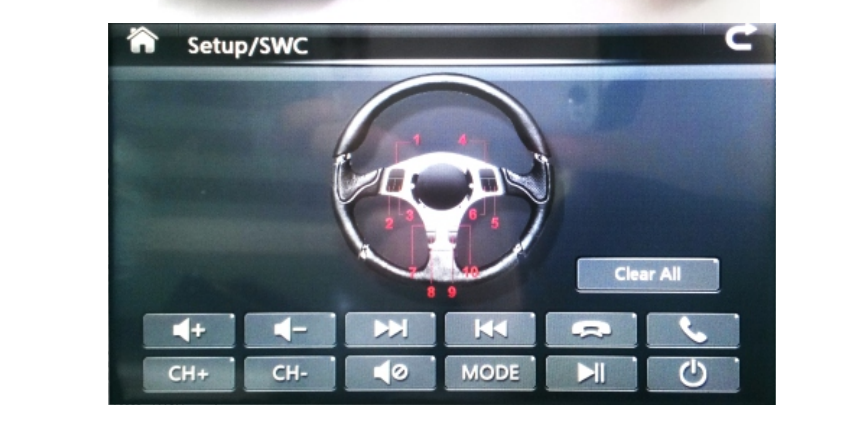
    Q5: Why the car head unit’s steering wheel buttons don’t work ?

Here is the instruction for how to set the steering wheel buttons:

unnamed

unnamed (1)

    Q6: The radio tuner of Android car stereo is not working any more. It can open but is not detecting any signal.

  • Please check whether you had connected the radio antenna tightly.
  • Check the wire on the ISO cable ANT-CONT, and connect it with the blue wire on the radio antenna to power for radio.
  • Please enter the factory setup in the unit and check the radio area, the password is 126.
  • When using the radio, please turn off AF and TA option first, and then search the radio station.

    Q7: The navigation button is not working, but the navigation software works fine when I open from the touch screen, maybe I have a bad OS version. Can you send me the link for the latest one for that car head unit ?

Please back up your important files before update it.First of all, please download the installation package from

https://mega.co.nz/#!AY9TQTba!rce-Dn5dJyfTiPSm_NCRsJ6UjxMh_HaZNfraBf7tUe0

Then unzip it and copy all files to an empty SD card (notes: without folder).

After that please turn off the unit and insert the SD card to GPS slot. Last but not least, turn on the unit again to update.

    Q8: The power light of car stereo is illuminated, but the OBD2 adapter’s light don’t light up. What should I do ?

About the OBD, the normal whole instruction is :

  • Please enter our “Bluetooth”application, then set the pairing code of the radio to the same one as the OBDII scanner’ Generally it would be 0000 or 1234.( please try both )
  • Then please open the built-in torque, choose the OBDII scanner MAC address in the application setting and choose your car protocol.
  • At last, please do it step by step on this video:

https://www.youtube.com/watch?v=PwFJx0V84VM

www.pdf24.org    Send article as PDF   
25May/15

How to Install an Android Car Stereo

It's only fair to share...Share on FacebookShare on LinkedInPin on PinterestShare on RedditShare on TumblrShare on StumbleUponDigg thisShare on VK

First, turn off the electricity to the machine by removing the live battery wire from its station. After disconnecting the battery, you’ll need to take off the trim boards enveloping your car stereo. Each car just a tiny bit unique here.

Next, you need to dispatch the previous head unit directly out until the wires connected to the back are accessible. Unplug the cord, discharge the cabling harness and proceed to remove the antenna cable by unscrewing it. The cabling harness is the structural fastener that integrates all of the cabling for the sound system into an individual connection. The new head unit you have purchased should have included an adapter that matched the factory installed cabling. The end of the cabling on the end, should have four to eight colored wires coming from the back. There should be two such wires that plug to each speaker; one positive one negative. Most negatives are shown with a black stripe while positives are generally either solids or have a white stripe.

If your new car DVD player does not come with an adapter that works with the harness in the dash, you need to purchase a cabling harness kit. The new harness will have to be plugged into the new stereo. Match the colored wire to its match and put them together. After having the wires connected to their proper match, the stereo should be ready to install. Hold the system to the dash to plug the proper connections into the back. You can pause and test what you have done to make sure you have correctly pared the wires.

Once you find that everything is in order; proceed to carefully push the unit all the way into the dash and replace the screws. After the stereo is mounted correctly, put the trim boards back up and reattach everything holding them in place.

Finally, you got a new Android stereo for your car.

www.pdf24.org    Send article as PDF   
05May/15

10 Steps to Pick the Right Aftermarket Car Stereo

It's only fair to share...Share on FacebookShare on LinkedInPin on PinterestShare on RedditShare on TumblrShare on StumbleUponDigg thisShare on VK

In this passage, we’ll go over some of the basic steps involved in choosing a new car stereo for your vehicle.

Step 1

Determine your price range. You can get a decent car stereo for under $100.00 in most cases.

Step 2

See if you have a USB port. If you own an iPod or iPhone, some car stereos have a USB port that will, in most cases, read files off of your device, play your device, and charge your device, all via the USB-to-30-Pin cable that came with your iPod or iPhone.

If you don’t own an iPod or iPhone, the USB port on some car stereos accept USB thumb drives so it can read and play files off of the drive.

If you’re looking to not spend a lot, most all car stereos include a 3.5-millimeter auxiliary audio input jack that allows you to plug a 3.5-millimeter auxiliary audio input cable into both your iPod or iPhone or other device and into the jack on the stereo itself. This method will NOT control or charge your iPod or iPhone, however, and will NOT read files off of the device.

Step 3

Consider extras. If you are a frequent traveler, some car stereos offer the ability to add on a SIRIUS or XM Satellite Radio tuner that installs somewhere in your car’s interior. Or, in some cases, the car stereo will be satellite radio ready, and will only require an antenna to be run and connected to the back of the unit. You will need to, however, pay via a monthly or yearly subscription, for this service.

Step 4

Decide whether or not you want HD. If you are tired of listening to the standard AM and FM radio stations on your current car stereo, consider purchasing a car stereo that has a built-in HD Radio tuner. HD Radio is free to listen to, and has better sound quality than standard AM and FM radio stations do. Instead of only a single AM or FM radio station on one frequency, there are three to five additional AM or FM radio stations on that same frequency.

Step 5

Decide if you want to have bluetooth capability. If you are always in your car, some car stereos allow you to add-on Bluetooth, or buy a car stereo with Bluetooth standard. The caller’s voice comes through all of your vehicle’s speakers, and most car stereos include a built-in Bluetooth microphone. You connect your phone wireless to the car stereo in order to use it. Some car stereos even allow you to stream music wirelessly from your Bluetooth-enabled device.

Step 6

Go “Mechless”. If you do not find yourself listening to CDs in your car a lot, then you may want to consider buying a “mechless”, or digital media car stereo. These car stereos do NOT feature a CD player, and only a radio, with integration for iPods, iPhones, and other devices. These are generally cheaper to purchase.

Step 7

Consider your factory car stereo’s options. Do you have a CD changer in your trunk? Does your car have factory satellite radio? Do you have controls on the steering wheel for the radio? Do you have an upgraded factory premium sound system and/or an amplifier? Does your factory car stereo already have Bluetooth and iPod and iPhone and USB inputs? Does your vehicle use its factory car stereo to play the warning chimes through your vehicle’s factory speakers? These are only some of the considerations required when replacing your vehicle’s factory car stereo.

Step 8

Consider the method of installation into your decision process. Can you install the car stereo yourself? Or will you be paying someone or getting someone to install the car stereo for you? Most consumer electronics retailers or car audio shops will install your new car stereo for a fee. If you ARE installing the car stereo yourself, is it difficult to disassemble your vehicle’s dashboard to get to the factory car stereo?

Step 9

Consider the expandability options. Do you want to add any features onto your new car stereo later?

Step 10

Finally, find the right-fitting car stereo for your vehicle. DIN units are the most common type of car stereo, and only take up a small, rectangular space in your vehicle’s dashboard. DIN-and-a-Half, or Double DIN units are used in many American and Import vehicles. They take up a larger, more square-like space in your vehicle’s dashboard. A factory car stereo may require DIN tools to be removed, available at most consumer electronics retailers and car audio shops for less than $5.00, or you can make your own set of DIN tools out of old metal coat hangers.


www.pdf24.org    Send article as PDF   
image_pdfimage_print