Category Archives: How to

image_pdfimage_print
08Aug/16

How to Solve Pumpkin Car Radio DVD Stereo Do Not Save Time/Radio Station/Settings

It's only fair to share...Share on FacebookShare on LinkedInPin on PinterestShare on RedditShare on TumblrShare on StumbleUponDigg thisShare on VK
You may have ordered android car radio or wince car gps from Pumpkin.To make the autoradio gps dvd palyer works well,people always have their confusion.So Pumpkin here will tell the solutions to some regular questions our customers may have.

Today we’ll offer some technical advise when you find that your car dvd can not save information,such as time,radio station,settings and so on.Normally,these issues happen due to wrongly connection of cables.Here’s the details.


Basic Car Radio Connection

In general If you have purchased an ISO adapter or your vehicle has a standard ISO connection getting power to your unit should be as simple as plugging the connections together, however there are a few exceptions.

These exceptions will generally present in one or more of the following ways.
-The unit will not switch on
-The unit will not hold the memory function for the time or radio
-The unit will switch on at first installation and will not switch on after the ignition or stereo is switched off
-The unit lights up when reset is pressed but will not switch on

If you are experiencing any of the above or something similar you will need to make slight alterations to how the ISO is wired.

For correct operation the stereo needs to be powered as descibed here
-Yellow Wire 12V permanent
-Red Wire 12V Switched from the ignition (ACC)
-Black Ground

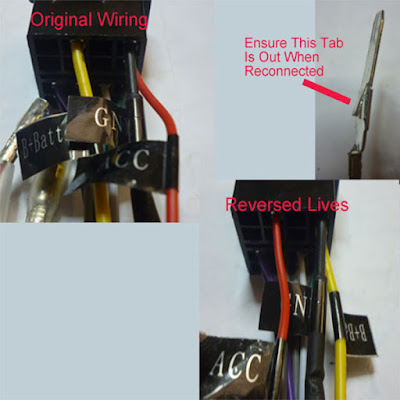
Most commonly this is resolved by “Reversing the Lives” this is simply removing the RED and YELLOW wire and exchanging their position in the ISO. Each pin has a small tab that can be depressed with a small flat screwdriver allowing you to remove the pin from the ISO connection, when removed press the tab out so it will lock into place when reinserted. If you can not get it out, you can simply just cut the wires, and exchange them to made the new connection.

CANBUS

In more modern vehicles with CAN controlled ACC switch there is no ignition live so slightly more work is required.

Firstly you will need to take a multimeter and check that the YELLOW wire has a permanent 12V feed.

From here you will need to source an ACC feed for the RED wire, in general if your cigarette socket is only live when the ignition is on you can take the feed from here (alternatively a little time and investigation is needed to source a feed directly from the fuse box).

Find more double din car radio,android 5.1 car stereo,wince car gps dvd player,headrest monitors and other auto accessories on Pumpkin official websites:
German site: www.autopumpkin.de

via Blogger http://ift.tt/2b0cQvz

www.pdf24.org    Send article as PDF   
08Aug/16

Kundenmeinung auf Universal Auto Monitor 10,1″ LCD Bildschirm Kopfstützenmonitor Kopfstütze Auto DVD Player

It's only fair to share...Share on FacebookShare on LinkedInPin on PinterestShare on RedditShare on TumblrShare on StumbleUponDigg thisShare on VK

Heute werden wir überprüfen Kundenmeinungen auf den Pumpkin Universal Auto Monitor 10,1″ LCD Bildschirm Kopfstützenmonitor Kopfstütze Auto DVD-Player -CH1005B.

Nach der Installation:

Kundenbewertung:

Vor allem: die Files, USB-Sticks und DVDs haben im Player problemlos funktioniert. Ich habe keine probleme beim Einstellen und Verwenden vom media Geräten. Das Gerät konnte schnell montiert( dank der geboteten Passstücke geht das reibungslos) und leicht bedient werden.
Last Memory Position funktioniert bei DVD und USB-Stick wie versprochen.
Durch die zoom Funktion lässt sich die Größe der ganzen Bildschirmes nutzen (bei 16:9 DVD’s).
Billiges aber hochwertiges, gut ausgestattetes Produkt.Bestellen gerne ein Zweite.

–by Patricia

Pumpkin Universal Auto Monitor hat alles was man für eine lange Autofahrt braucht.
Spielt DVD’s, CD’s und USB-Sticks ab. Man kann sogar damit Zocken…

Die Halterung hat einen guten eindruck gemacht, man mußte lediglich in regelmäßigen Abständen die Straube vom Monitor nachziehen, oder aber vielleicht mit einer Zange festziehen, die den Monitor in der Halterung hält. 1-*

Die Bildqualitär war toll. Der Ton war auch ok.

–by R

Funktionieren tadellos, sehen OK aus. Bild ist gut. Ließen sich hervorragend ins Auto integrieren. Man kann hin und her schalten und die Filme gegenseitig zu schalten.

— by Hero

Finden Sie weitere kfz dvd player auf Pumpkin offiziellen Websites:

US site: www.autopumpkin.com
UK site: http://ift.tt/29hvZcz
Deutsch site: www.autopumpkin.de

www.pdf24.org    Send article as PDF   
05Aug/16

How to Connect and Set Up Steering Wheel Controls on Pumpkin Universal Autoradio DVD GPS

It's only fair to share...Share on FacebookShare on LinkedInPin on PinterestShare on RedditShare on TumblrShare on StumbleUponDigg thisShare on VK
All Pumpkin Universal 1 or 2 DIN car radio are compatible with vehicles that have analogue steering controls (SWC), some additional wiring is required.
– With the help of a multi-meter locate the + and – SWC cables from your vehicle.
– Connect the + and – Key wires on the supplied SWC cable (all vehicles are different some have only 1 live others have 2)

If your vehicle has digital steering controls you will require an ISO harness with steering interface and patch lead. We recommend using connects2 adapters with CTCHINAHULEAD the patch lead should then be connected as above.

Once this has been completed the steering wheel functions can be programmed with the car dvd, this procedure varies depending on the user interface of your autoradio as a general guide please follow the steps below.
Enter the settings menu of your pumpkin radio and select Steering Wheel Control, this will access the SWC set up interface, here is a quick guide to programming:
Press “Clear All”, to clear the unit memory (not required by all units)
Now you can begin the programming of the specific functions:
1. Select VOL- on the stereo,
2. Press the same function button on the steering wheel, wait for the display reading to give a steady read out.
3. Repeat this process until all relevant functions are programmed
4. Once all functions have been set press the COMPLETE button (not required by all units)
5. Exit the SWC interface and go to the Home screen
6. Press VOL+ to check if programming was successful.

Additional Information.
SWC set up is trial and error, in most cases you will find your first attempt successful however if you find not all functions work or 2 buttons operate the same function can follow the advice below.
Firstly if you have 2 lives connected try each live individually on each connection, then try them together on the opposite lives.
Secondly if your stereo has Hi-Z and Lo-z (also called resolution) try the above combinations again.
Finally try grounding the SWC GND from the SWC to the stereo instead of the SWC circuit.

During programming all presses should be slow and deliberate to ensure the best range is set, if 2 keys commonly register the same function do not program these together change the programming order, it may take more than one attempt to get this right please be patient and take your time, if in any doubt have a qualified professional check your connections.

PS:  Pumpkin is running 2016 Olympic Games Promotion on US website.Get Pumpkin android auto dvd player at 5% off with coupon code android5%

via Blogger http://ift.tt/2aFtqO5

www.pdf24.org    Send article as PDF   
image_pdfimage_print