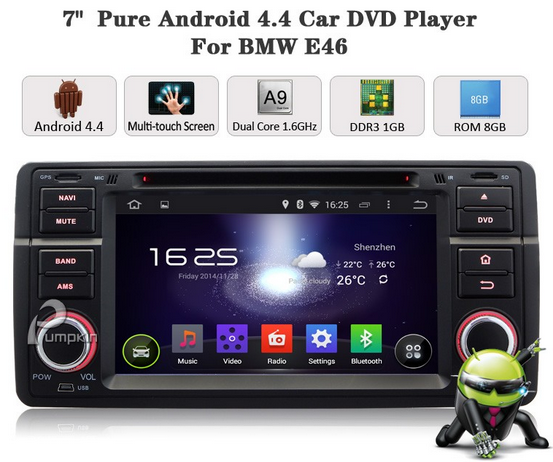
Tag Archives: single din gps

image_pdfimage_print
17Aug/15

【Pumpkin Consumer Review】BMW E46 Android 4.4 7-inch Car Stereo

It's only fair to share...Share on FacebookShare on LinkedInPin on PinterestShare on RedditShare on TumblrShare on StumbleUponDigg thisShare on VK

QQ截图20150728174859


Key Features:

  • Aftermarket Android 4.4
  • Cortex A9 Dual-Core 1.6GHz
  • RAM DDR3 1GB
  • 8GB memory, Support both 3G and Wifi
  • Support BMW E46 Series on your car DVD
  • Support 1080P Video
  • Support DVR, OBD2

By Corban Dallas

I had never heard of this unit before and found it on a random search through Amazon, I figured for the price it was worth a shot since the Dynavin is still a good bit more expensive… I am very impressed by it!

  • Installation

Installation was silly easy, I got it done in a couple of hours and that was because I wanted to hide the wires for the GPS antenna and Bluetooth microphone, if you’re less picky than me you could get it done in a half hour.

  • Screen, buttons and knobs

The buttons and knobs are very well built, the finish is slightly more glossy than the stock business radio of the E46, though I suspect part of that is due to aging of the stock materials. The screen is bright and clear and the touch screen is very responsive, the colors and sharpness are great.

  • Audio quality

I was worried that the audio quality would be worse than the stock CD player, but it’s definitely not when using equal mediums (CD’s, iPod, radio, etc.), but when streaming Bluetooth it’s not the best, most people probably wouldn’t notice the difference (my friends didn’t), but if you’re like me and like clear audio you’ll want to stick to CD’s, SD cards or an iPod.

  • GPS navigation system

I love the navigation which displays the speed limit of the road you’re on as well as warning you if you’re speeding, it can also display any nearby gas stations, hotels and many other things and lets you choose which ones you can see or not see.

  • App installation

The unit comes with a .apk installer app so that you can install any app from the Google Play store from an SD card, or anywhere else you could find a .apk app. It also has the Google Play Store app installed on it so if you use your phone as a mobile hotspot for the on-board wifi or use a 3G data card in your unit you can download apps directly from the store.

The included apps are pretty good. My only gripe with the pre-installed music player is that there is no shuffle button, that seems like a huge oversight, otherwise it works well and the equalizer presets are pretty good, as is the custom mapping option that it gives you.

  • Conclusion

All in all I’m very happy with this unit and would highly recommend it to anyone. It’s made the interior of my E46 feel much more updated and new. In fact, my girlfriend just bought a new Ford with the “My Ford Touch” option and she agrees that the nav screen in my E46 is better.

PS: Autopumpkin.co.uk website is launched: 2-5 days delivery; NO tariff & Free shipping to UK and EU.

www.pdf24.org    Send article as PDF   
06Jul/15

How to Install an LCD Monitor in Your Car

It's only fair to share...Share on FacebookShare on LinkedInPin on PinterestShare on RedditShare on TumblrShare on StumbleUponDigg thisShare on VK

Installing an LCD, or liquid crystal display monitor in your car can add a convenient method of visual entertainment, as well as practical functionality. The LCD monitor could be used for watching DVDs, playing video games, or for GPS navigation systems. It can be useful for long trips or just driving around town. To learn how to install an LCD monitor in your car, consider these suggestions.

Steps

0]3](A@_CR@8B2PO6M7JJJ9

1.Determine the location for the monitor. When installing an LCD monitor in your car, determining its intended purpose will help you know exactly where it should be installed. If the video playback will be primarily for children, for example, a popular option is to locate the monitor on the back of the front seat headrests for back seat viewing.

670px-Install-an-LCD-Monitor-in-Your-Car-Step-2
2.Disconnect the cables from the vehicle’s battery. Raise the hood and locate the vehicle’s battery. Verify the correct sized wrench or socket and remove the terminal attaching the battery cables to the battery. Disconnecting the battery will help ensure your safety, and protect the electronic components of your vehicle from short circuits.

670px-Install-an-LCD-Monitor-in-Your-Car-Step-3
3.Purchase new headrests with built-in LCD monitors from an electronics dealer. This is the easiest method of installing an LCD monitor for back seat viewers.

  • Remove the old headrests by simply pulling them up from the seats.
  • Insert the new headrests in the same place. Attach the wiring to the DVD or video game player and nearest power source.

Mounting LCD Monitors in the Vehicle Dashboard

670px-Install-an-LCD-Monitor-in-Your-Car-Step-4

  1. Purchase an LCD monitor designed to retrofit the dashboard of your vehicle.This is the best option if the monitor is to be used by the driver and front seat passenger. Using standard tools, locate the screws or pins holding the face plate and any other cover from around the vehicle’s stereo receiver.
  • Unplug the existing wiring harness from the receiver and remove the old unit. Plug in the new LCD monitor unit into the wiring harness and insert it into the dashboard.
  • Reattach the face plate and other covers around the new unit. Take precaution not to strip mounting screws by over tightening.

670px-Install-an-LCD-Monitor-in-Your-Car-Step-5

2.  Reattach the battery cables. Place the terminals back on the battery and tighten with correct sized wrench. Now that the power had been restored, turn the new LCD monitor on and adjust the settings according to the manufacturer’s instructions. Test all the functions of your new unit, including the video and audio.

Source:  Wikihow.com

www.pdf24.org    Send article as PDF   
image_pdfimage_print