How to Install an After Market Radio in a VW Jetta 2003

The 2003 Volkswagen Jetta Car Stereo features an eight-speaker audio system with an in-dash “double-DIN” combination CD player and tape player. Thanks to the double-DIN size mounting provisions for the radio, installers have a broader range of choice when selecting a suitable aftermarket unit. Although the removal and installation process for the audio head unit can be achieved in a relatively short amount of time, several accessories are required to adapt an aftermarket unit to the vehicle.

Radio Removal
Open the vehicle’s hood and locate the battery. Disconnect the black negative battery cable from the “-” battery post, using an appropriate-size socket and ratchet.

Insert the four removal keys into each corresponding slot on the radio face, positioned at each corner, with the straight edges of each key pointed away from the radio.

7 Inch Touchscreen Quad Core

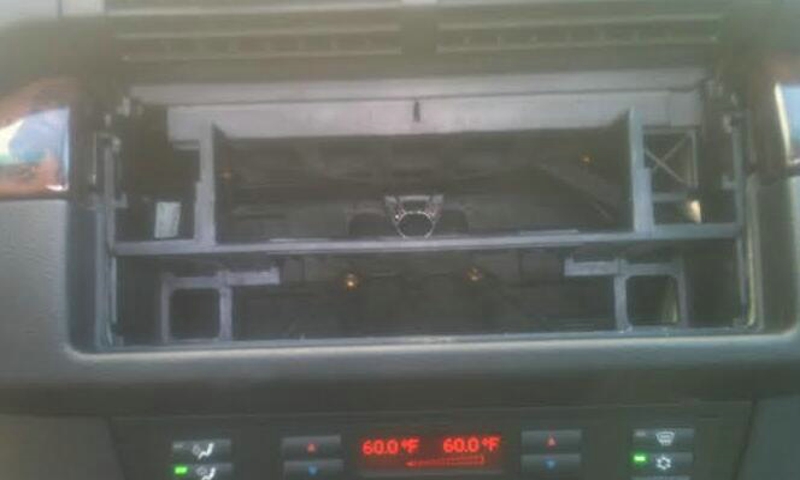
Grasp the left side keys and pull on the radio while using outward pressure to disengage the locks. Perform the same action with the right side keys, until the radio is pulled out far enough to finish the removal process with your hands. Depress the raised portions of the locking mechanisms, located on the side of the radio’s chassis, to remove the keys.

About The Tablet
Examine the rear of the radio and disconnect the antenna cable. Certain vehicles may include a second “diversity” antenna connection, which requires a dual antenna adapter. Take note that you must depress the connection tab on each antenna cable.

Disengage the locking lever on the square-shaped wiring harness block, located opposite the antenna connections.

Wiring
Gather the wiring diagrams supplied with the aftermarket radio and wiring harness adapter. Remove the pre-cut insulated ends of each of the wires; twist the wires to prevent frays.

Crimp each wire from the harness adapter to the corresponding wires for the aftermarket radio harness, using the bullet connectors and with aid of the diagrams supplied with each product. Take note that the wire color-coding may not necessarily match between the products.

Wrap an overlapping layer of electrical tape over the splices to form a single group of wires. This will help prevent damage to the connections when installing the radio.

Connect the antenna adapter to the factory antenna cable(s), according to the product’s instructions. Do not connect the wiring harness adapter or antenna adapter to the radio at this time.

Mounting Kit installation
Fit the mounting kit to the aftermarket radio, using the product’s specific instructions. For DIN-size aftermarket units, slide the universal mounting sleeve off the radio chassis; install the mounting sleeve within the kit’s mounting hole. Use a flat-head screwdriver to bend the small sleeve tabs against the rear side of the mounting kit; this will secure the sleeve to the mounting kit.

Connect the radio wiring harness to the rear of the radio, followed by the antenna adapter.

Slide the mounted radio into the console opening. Do not slide in or fit the radio into the opening completely at this point.

Reconnect the negative battery cable to the battery. Test the new radio for proper functionality. If there appears to be an issue, turn off the radio immediately and check the harness connections.

Press the radio into place after making the necessary functionality tests. Testing the radio before finalizing the mounting process will avoid unnecessary complications with removing the car radio.

German site: www.autopumpkin.de


Tips On Installing Android BMW Navigation System DVD Player

More and more BMW X5 E53 owners prefer to upgrading the factory car stereo with an aftermarket one which has DVD player and GPS navigation system built-in,such as Pumpkin Android BMW navigation dvd,wince 6.0 BMW navigation car dvd. And some of these people would like to install the new replacement by themselves, but there may be some problems during installation if you have never installed an aftermarket car gps dvd palyer before. We write this post to introduce you some tips on installation of Pumpkin android 5.1 BMW Car Navigation GPS DVD Player.

If your BMW X5 e53 just comes with factory car radio and CD player in dash, there’s a plastic cage inside of the dashboard as you can see after you take out the factory radio and CD, if you don’t remove this cage, you may think it does not fit into the opening of the original entry, the new BMW navigation dvd unit can not be pushed entirely into the dashboard, see pics below:


Don’t worry, there are two methods which can allow you to push the new BMW X5 navigation car dvd into the dashboard fully. Some installers just cut the plastic cage, and others remove it.

In order to remove the plastic cage, firstly take off the 4 screws that hold the cage in place, 2 on the right side, and 2 on the left side (same as right side). The following pictures are for your reference:


You need to pull down and slightly left the dash part which is close to the steering wheel. When you are doing this, use your other hand to push down in the middle of the opening where the cage is, and as you opened/pulled the dash/trim this far, you are able to hold it with one hand in this position and start wiggling the cage with your other hand. When are doing this, some force is necessary, but not too much. Once you start playing with it, you will get the jest on how to pull out the hooks, then as you have the left hook out, you now pull to a side and down on the right side (glove compartment side) to clear the other hook.

Once you removed the plastic cage, you are able to push into the new unit into the dash fully. And you will need to use the included iron frame support to fix the new unit to the dash, you may check the following photo as referrence.

If your BMW X5 E53 comes with factory navigation system, there’s a large screen in the dash, the 17pins(before year 2002) or 40pins(after year 2002) plug is not at the back of your factory radio, it’s located under the trunk, so you need to use a 5m long power cable with 17pins or 40pins plug to connect the correct plug under the trunk.

The following video may help you about that!


Pumpkin official websites:
German site: www.autopumpkin.de


Making it Easier for Using Car DVD Players

One of the rarest components in web based business is trust.Clients should have a lot of trust to hand over cash to some more odd they have never found in the vain any desire for getting what they have paid for. The most ideal approach to lay their brains very still is by giving them data or noting their inquiries in a way that demonstrates that you hear what you’re saying.

On the off chance that you are offering auto DVD players on line we are here to offer assistance. We have given a valuable “cut-out and keep” FAQ record that you can glue onto any car DVD posting you may have.

Will the auto DVD player fit in my auto?

Regardless of whether this DVD player fits into your auto relies on upon two things, the Commotion size of the gap in your dashboard and the profundity of your dashboard.

Commotion is basically the German truncation for Deutsche Industrie Norm. It is the German Business Standard for every single car parts and numerous other mechanical and electrical segments. The one that influences you is 1 din and 2 din and it depicts the width and stature of all car DVD players and auto stereos.

In the event that there is a bigger squarish gap in your dash then you will have a 2 Din Car Stereo gap, on the off chance that it is long and limit then it is a 1 Commotion opening. Unless you need to do some redesigning deal with your dash it may be a smart thought to get the correct size Commotion.

Be that as it may, the Clamor just covers the stature and the width of the auto DVD. The perfect approach is to look through the auto proprietor manual for the estimations of your auto dash and after that stack that up against the measurements of the auto DVD from this posting or from the maker’s site. In the event that it is too long then it won’t not be the best model to pick.

Is it difficult to introduce a DVD player in my auto?

Introducing an auto DVD player is not a simple thing to do, particularly on the off chance that you have not done anything like it some time recently. It would presumably be savvy to request that an expert do the establishment as opposed to doing it without anyone else’s help.

Notwithstanding, on the off chance that you feel sufficiently secure that you can do it without anyone’s help there are numerous sites that, alongside the auto DVD player directions, will get you through the establishment procedure. Ensure you read and see the greater part of the directions before proceeding with the establishment. Guarantee you have given yourself enough time to take care of business.

Introducing a DVD player in an auto isn’t an occupation you can do overnight on the off chance that you haven’t done it some time recently.

How would I combine my Blue tooth telephone with the auto DVD player?

It is not hard to match auto DVD players and blue tooth mobile phones. There are two essential stages to the procedure.

* Preparing the car DVD.

* Setting up the phone.

Setting up the auto DVD for blue tooth is as simple as going into the blue tooth menu. You may need to press “match” on the auto DVD when you are in the blue tooth screen.

You should discover the Bluetooth menu on the telephone to combine it. This might be on the fundamental menu, however in the event that it isn’t it will be in either an availability menu or a settings menu then network.

At that point you should make the accompanying strides:

* Switch on the blue tooth work.

* Guarantee that the telephone is “unmistakable” to other blue tooth gadgets.

* Locate any blue tooth gadgets inside the scope of the telephone’s blue tooth work.

* Select the auto DVD player. It might be called ‘auto unit’.

* Enter your watchword (you will discover this in the mobile phone’s proprietor’s manual).

Since you have glued these answers onto your auto DVD players postings your clients will be sufficiently certain to purchase auto DVD players off you, keep on dealing with you in future and educate their companions regarding your business.

 Exploring our official website:
UK: http://www.autopumpkin.co.uk/
DE: Android Autoradio