


This installation guide walks you through the process of installing a new Android car stereo. Please read over these guidelines before beginning the installation in order to give yourself an idea of what to expect.
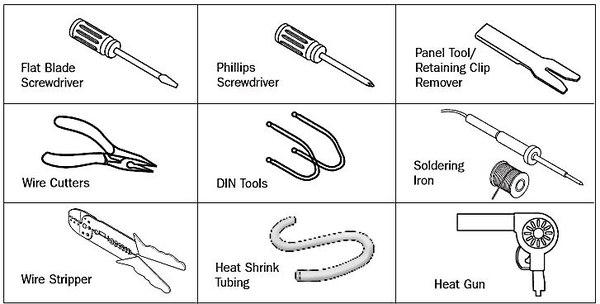
Tools Needed (depending upon vehicle)
Remove the factory stereo
When installing a new stereo in your car, your first step will be to remove the old stereo. Pay close attention to the steps involved, for the process for installing your new stereo will be the same, but in reverse.
For detailed information on how to remove the factory stereo in a specific vehicle, refer to your Crutchfield MasterSheet™ instructions, if available. They will walk you through the process step-by-step. Otherwise, you may use the general guidelines below.
Before you begin, start by setting the parking brake and removing the negative cable from the car battery to prevent accidentally short circuiting something.
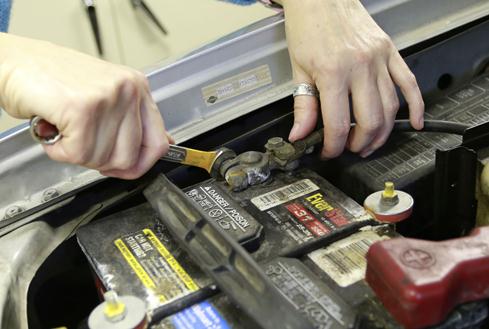
Disconnect your battery’s negative terminal before any installation job to protect your electrical system..
Your factory stereo will be mounted in one of two ways:
- secured in a metal mounting sleeve by spring clips
- bolted to the dash with brackets
Spring clip mounting
If the stereo is held in by spring clips, you’ll need a pair of DIN tools. Insert the DIN tools into the holes on eitter side of the unit until a click is heard. The tools serve to release the spring clips and also hook onto the sides of the stereo so that you can pull it out easily. Spread the tools apart slightly then pull the stereo out of the dash.
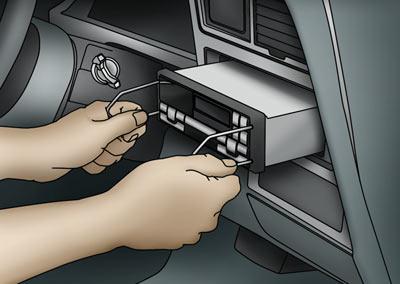
These DIN tools are used to remove the factory stereo from a 2000 Ford Expedition.
Bolted in place
Sometimes, accessing the stereo requires the removal of one or more trimpanels from the dash. You may have to (carefully) pry the plastic trim away from the dash (which is often secured by hidden pressure clips), or locate and remove bolts to disassemble other pieces of panel. Once you have gained access to the factory stereo, removal should be obvious. The audio player will almost always be secured by four screws, sometimes bolted directly to the front of the dash, other times secured to side brackets. Remove the screws and pull the stereo from the dash.
Four bolts and a pair of side brackets attach the stereo to the dasgh in a 1998 Toyota Sienna.
American cars built before the early 1980s often came with a “shaft-style” stereo, which secured to the dash via nuts and washers to the right and left knobs. A shaft-style stereo must be installed from behind the dash. Getting it into position is the tricky part, since your vehicle’s wiring,heater controls, and ductwork may be in the way.
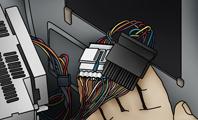
Unplugging the factory stereo
If your vehicle has (or once had) a factory stereo, or if it was pre-wired with a “stereo prep” package, there should be at least one plastic wiring harness behind the stereo opening. This plug(s) connects the stereo to your vehicle’s electrical system, and also makes the speaker connections. You will need to unplug the factory stereo from the wiring harnesses, and unplug the antenna to complete the removal process.
Connect the wiring
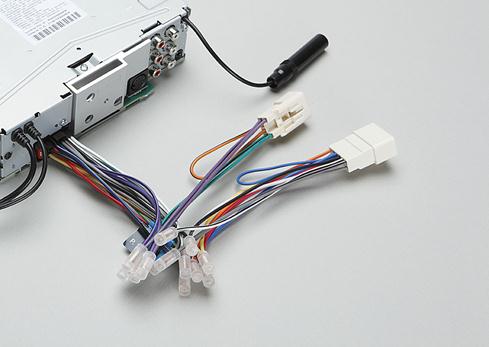
If Crutchfield carries a custom wiring harness for your vehicle, you can use it to connect your new stereo to your vehicle’s factory wiring harnesses. This will ensure that everything works seamlessly, just like the factory stereo did.
A custom wiring harness makes installing a new stereo much easier.
If a harness is not available for your vehicle or if the factory stereo plug was cut off, you’ll need to identify each of the stereo wires and connect them to the corresponding wires of your new stereo.
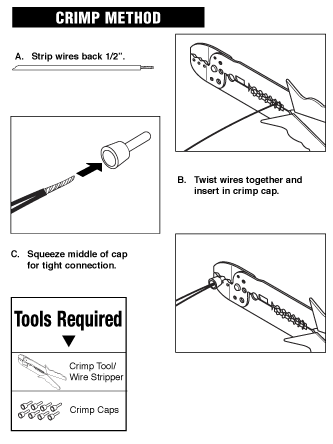
Crimping, Posi-Product™ connectors, and soldering
Decide how you want to connect the wires together. Crimping is fast and fairly simple. If you crimp the wires together, be sure to use the correct size crimp connector — typical in-dash stereo wires are 18-gauge, but a few use heavier gauge power and ground wires. There are several types of crimp connectors, including bullet connectors, butt connectors, or crimp caps.
Posi connectors offer a quick and secure twist-on connection for wires, and they can be re-used. Like crimping, you’ll want to make sure you have the right wire gauges for the job.
Posi-Product connectors provide secure connections for your wiring.
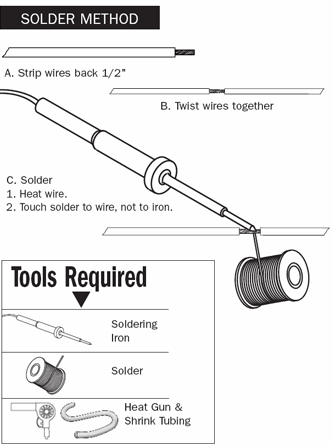
Soldering creates a permanent, professional connection that ensures maximum current transfer. We strongly recommend that you use heat-shrink tubing and a heat gun to insulate the soldered connection. Avoid taping the wires together — the tape will dry out and fall off, exposing the wires and making it only a matter of time before something shorts out.
Power
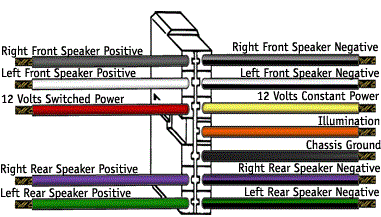
Usually, it is best to make all of the new stereo‘s wiring connections via the wiring harness, but if you have to make a direct power connection, you’ll need to know the difference between “switched” and “constant” power.
A switched power source is only on when the ignition is keyed — connect your new stereo’s main (switched) power lead to a switched power source, so that the stereo will turn off when you turn off the car, and not drain your vehicle’s battery.
A constant power source is always on — connect your new stereo’s memory lead to a constant power source, so that you don’t lose your stereo preset, sound shaping, and clock settings every time you turn off the vehicle.
A rare few high-powered stereos require you to make a direct constant power connection at the positive terminal of your vehicle’s battery. This requires a heavier gauge power wire, an in-line fuse (usually included), and a ring terminal to connect the power wire to the battery clamp. You will have to route the power wire through the vehicle firewall and into the engine compartment in order to make the connection at the battery.
Ground
A good ground connection is vital for proper stereo performance. If you are not using a custom wiring harness, look for a bolt, screw, or wire that contacts the bare metal of your vehicle’s chassis. Loosen the bolt, slip the ground wire underneath (this is almost always a black wire), then tighten the bolt. If your ground wire doesn’t contact bare metal, your stereo won’t operate. A loose or weak ground connection can result in signal noise interfering with your music.
In-dash video wiring
If your new Android car DVD player has a video monitor built in, you will also need to connect a wire to your emergency brake wire. This wire acts as a switch to turn on the video monitor when the parking brake is engaged. Follow the instructions included with your in-dash monitor to locate the emergency brake ground wire.
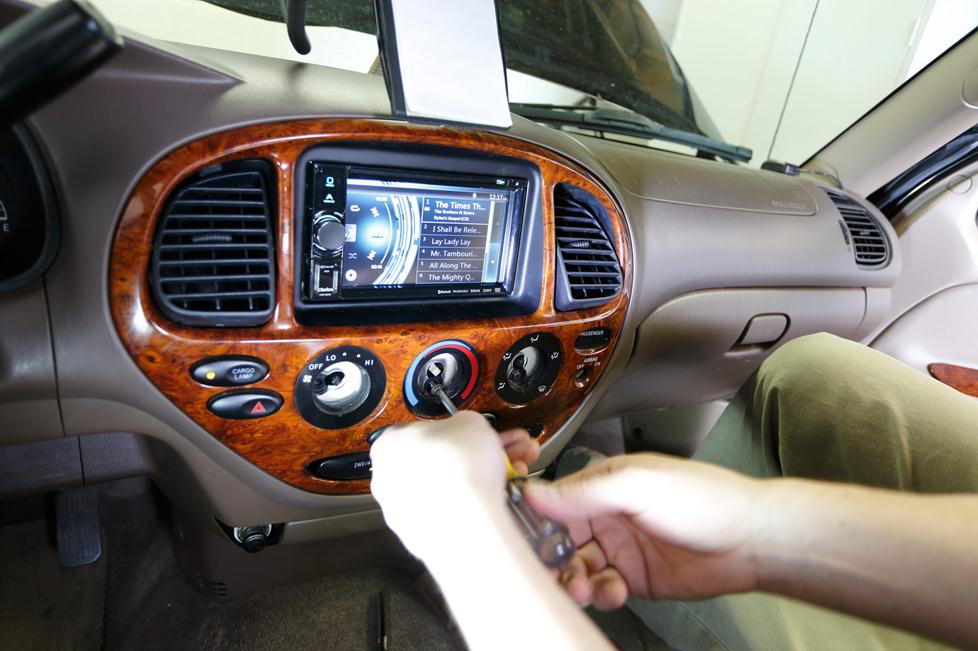
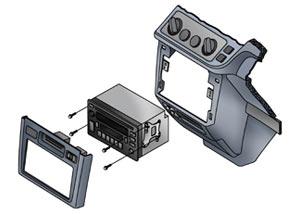
Install the new stereo
If the original stereo was bolted into the dash, you might need to remove the mounting brackets from the sides of it and attach them to the sides of your new stereo. More likely, you will need a mounting kit (which may include a trim ring, a dash insert, brackets, a faceplate, and/or a metal mounting sleeve) to install the stereo (Figure 1).
If a mounting kit is required, install it first. Then slide the new stereo’s metal mounting sleeve (if included) into the kit. Secure the metal sleeve by using a screwdriver to bend the sleeve’s metal tabs into place (Figure 2).

Once the dash opening is ready for the new stereo, hold the stereo near the opening. Connect the stereo wiring adapter to the vehicle’s wiring harness and plug in the antenna cable.
Slide the car stereo Bluetooth into the dash opening, but don’t fasten it down just yet. First, test the stereo to make sure everything is working properly. It’s easier to fix a problem while everything is still exposed. Turn on the power and try each source (AM, FM, CD, USB, etc.). Then adjust the balance and fader settings to check that each speaker is working. Once you’re sure the stereo is wired and working properly, finish securing it in the dash and reinstall any pieces of dash trimpanel that you removed.
Installing a backstrap
A mounting bracket — or backstrap — is often included with new stereos. For most installations, a backstrap usually is not a necessary part of the installation process. However, it can be useful to help support the stereo in your dash; it also helps reduce vibration. One end of the backtrap attaches (with a screw) to the rear of the stereo. The other end attaches to an existing bolt or screw behind the dash. Just bend and shape the backstrap as necessary to enable mounting.
You might need to use a backstrap to support the rear of your new stereo.
Can you do it?
If your vehicle has an upgraded version of the factory sound system or an integrated stereo/climate control panel, you will probably need a special “OEM integration” adapter in order to install a new stereo. An adapter allows you to use a new stereo with your existing speaker system.
This adapter allows you to install an aftermarket stereo in a 2010-up Chevy Camaro’s dash panel, while maintaining all heating, ventilation, and air conditioning controls.
Evaluation
By now you should have some idea of what is involved in replacing your factory stereo with a new, better, aftermarket stereo. The next step is to see if Crutchfield has a MasterSheet™ for your vehicle. That’s a set of installation instructions custom designed for your specific vehicle. It will describe every step of the process and tell you where to find every screw you need to remove for the installation. A MasterSheet™ takes all the guesswork out of the installation.
Even without a Crutchfield MasterSheet™, most people can install an in-dash stereo without much trouble, using just the tips in this article. This in turn leads to a savings in installation fees ($50 is common, and often it’s more). But if you would rather not tackle the task, there are competent and highly trained professional stereo installers in every town where you’d find teenagers and cars.
First published by Crutchfield.com.
![[JRC[BD`D5U$S]YN@B97BHL](https://blog.autopumpkin.com/wp-content/uploads/2015/06/JRCBDD5USYN@B97BHL.png)