Category Archives: How to

image_pdfimage_print
04Dec/20

How to install a headrest DVD player in a car?

It's only fair to share...Share on FacebookShare on LinkedInPin on PinterestShare on RedditShare on TumblrShare on StumbleUponDigg thisShare on VK

Nowadays, families are spending more and more time in their cars than ever before, which means children are getting more bored and restless in the car. So sometimes they just need something to keep their attention on trips.

A great solution to keep your passengers occupied is a headrest DVD Player. This way, everyone can enjoy their favorite movies or TV shows, significantly reducing travel time. Fortunately, installing DVD players for car headrests is easier than you imagine.

In this article, we’ll take a look at installing headrest monitors and show you everything you need to know. Read on to learn all the facts.

7_800x
The headrest:
To install this DVD player in your car, you must first remove the headrest. This is because the power cables and connectors must pass through the holes in which the headrest is mounted on the seat.
Then remove the cover far enough from the bottom of the seat that you can fish out the wires that you passed through the holes at the top.
Currently, most players can be solved directly with the mounting bracket without removing the headrest.

Hiding the power cables:
Typically, the cables are connected to the main unit under the dashboard. However, you can also feed them to a separate power supply if you prefer.
In order not to make the wires visible, we recommend to run them under the carpet. Otherwise, it looks sticky. Also, it is quite likely that exposed wires will eventually get caught on a person’s foot and be pulled out.
The use of a DVD headrest is also ideal for the IPTV service.

Connect the sound:
Now you need to connect your DVD player to the stereo in your vehicle. This is not necessary for all DVD players, but it definitely offers the highest sound quality.
Note that when connecting the wires to existing stereo cables, you need to strip the ends to connect them together. Be careful when doing this. We also recommend soldering the splice if possible.

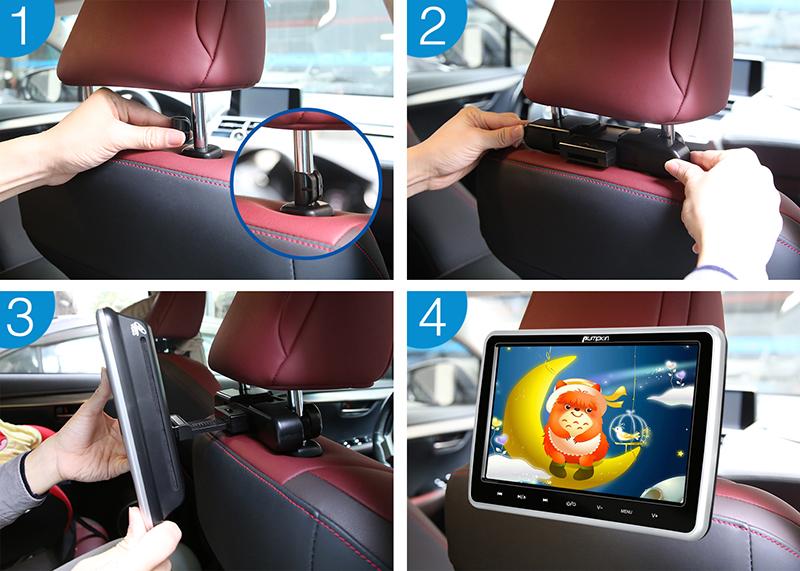
Install the DVD player:
This is actually the easiest step in the process. Once the wiring is complete, you will need to slide your new headrest into place. Be careful when installing the headrest posts. If the wires are kinked, this can prevent proper power supply and affect the sound quality.
So take it slowly. Once the headrest is secure, connect the power cord.

Clear up your mess:
The final step is to look for exposed wires. Tie them up with tape and hide them out of sight. Make sure everything is safe so that nothing comes loose and affects performance.

To install a headrest DVD player:
Installing a DVD player with a headrest is not rocket science. All you need is a little patience. There are many great headrest DVD players on the market that are suitable for all budgets. There are even clip-on models if you want to keep them as your original headrest.

DVD players are a simple and convenient way to keep everyone happy during long hours on the street. So choose your favorite action film or animated classic and get ready to enjoy the ride!

Pumpkin offers a variety of headrest styles and is easy to install and use.

www.pdf24.org    Send article as PDF   
17Nov/20

How to choose a Portable DVD Player

It's only fair to share...Share on FacebookShare on LinkedInPin on PinterestShare on RedditShare on TumblrShare on StumbleUponDigg thisShare on VK

Road-tripping parents who’d rather not hear the four dreaded words “Are we there yet?” from the back of the car. A portable DVD player can go a long way in alleviating the more mundane aspects of being out and about.
Films are a fantastic way to escape while on a trip, as you can easily invest in a story that will make time go by faster. We have countless DVDs of both movies and TV shows at home that we want to watch while on our trip. This is why buying a portable DVD player is a great idea for the entire family to enjoy.
If you have kids, this is a great way to keep them occupied and calm while on a lengthy trip. If you are traveling to a location without a television set, it is also a great way to end the night while watching one of your favorite films or shows. Here we are talking about some tips about choosing a portable DVD player.

Dimensions of Compatibility
Determine the size of the DVD player according to the place that you will always use the player. If you want the former, pick a laptop-style portable DVD player that would rest comfortably on your… well, lap. If your goal is a portable DVD player that serves as a car player, think about getting one designed for vehicular use. If so, you can go with one of the bulkier ones with a bigger screen and enjoy the larger, face-shielding viewing experience that comes with it.

Portability
“What if I fly a lot?” That you may consider a portable DVD player. Not only does weight easily add up when you’re cramming stuff into your carry on, but you also don’t want to be fiddling around with a honking-huge player when you’re taking off your shoes and emptying your pockets as other passengers give you the evil stare while going through airport security. For some of us, portable just works better for everything in our lives.

Region Locking
“Why can I play some DVDs, but not others?” Film studios use regional code protection in DVD technology to protect content and to control worldwide release dates, So the DVD player will only play the media that matches the region code of that player. All other media with other region codes won’t play at all. So you need to choose the right DVD player that can match your region code.

Battery Terms
Most of the DVD players can play over 4h and charge for 6h. You can pay attention to the specification about the payback time before you place an order.

www.pdf24.org    Send article as PDF   
17Jun/20

[Installation] Pumpkin 7″ Single Din Bluetooth Car Stereo with Flip Screen Navigation install on Volvo XC70 year 2002

It's only fair to share...Share on FacebookShare on LinkedInPin on PinterestShare on RedditShare on TumblrShare on StumbleUponDigg thisShare on VK

Here, we show how to install the 7-inch single din flip-out screen car radio in the Volvo XC70 year 2002. This is a universal car radio, it integrates with the RDS radio, Bluetooth BT hands-free calling and music streaming, GPS navigation, phone mirror-link, steering wheel control, Wi-Fi, and compatible with external USB, SD card, the Android Auto/ Apple CarPlay USB Dongle, DAB+ digital radio box, OBDII car scanner device, and backup camera. The display car radio is an Android 9.0, but Pumpkin has already released the Android 10 version car radio now. You can search on the Pumpkin official website.

See more information about Pumpkin 7″ Single Din Bluetooth Car Stereo with Flip Screen Navigation.


www.pdf24.org    Send article as PDF   
image_pdfimage_print